Monday, January 31, 2011

Sight Seeing

As I mentioned, Landon's cousin, Laura, came and visited us over the weekend. So, rather than spending my weekend working around the house, we took a trip around the metroplex to show Laura the sites. First stop ... IKEA! Okay, it's not really a tourist attraction, but Laura had never been to an IKEA, so we thought she needed the experience. And, of course, I picked a few things up while I was there. I'll show you my finds later this week.

Next was a stop for some great Mexican food! The weather was so great. It's hard to believe we were able to eat outside in January!


Laura is a big sports fan, so we also took a trip down to Fort Worth. The entire DFW metroplex is getting ready for Sunday's Super Bowl. ESPN was already setting up for their broadcasts , which will be live from Sundance Square this week.


And, after that, we hopped over to Arlington to see Cowboys Stadium. Apparently, a lot of other people had the same idea, because the traffic was crazy. But we were able to park at the Texas Rangers Stadium, which is next to it, and walk over to see all the excitement. The stadium was all decked out for the big game.


I'm actually pretty glad we took the trip, because we won't be heading down there next weekend. Our goal is to stay away from the crowds in Arlington, and watch the game at home. Do you have any big Super Bowl plans?

Friday, January 28, 2011

Our First "Official" Overnight Guest

Landon and I have a guest coming today! Landon's cousin, Laura, is coming down from Oklahoma to spend the weekend with us. We haven't seen her in a while and she's never been to this area, so we are excited to show her around. It's going to be a beautiful weekend here in Texas ... the temperatures will be in the high 60s! If you are a little jealous, just remember, our temps will get up to 110 degrees this summer ...

Laura is our first "official" overnight guest in the new house. I say first "official" because technically my coworker and friend, Monica, house/dog sat for us while we were in Nashville for Thanksgiving. So, she has stayed in the guest room, but we weren't here to enjoy her company.

As you may remember, I recently bought some new bedding and pillows for my guest room. Well, this week has been a busy week at work, so I haven't had time to do much around the house, but I did make one little purchase to add to the guest room in prep for Laura's visit. I had an extra reed diffuser at home and found some new fragrance oil and these cute reeds at Walmart, so I thought I'd make good use of it!


I know, it's not much, but I was excited to add it to the room. It's the little things.

So, because Laura will be here this weekend, I'll have to put my table project on hold, but hopefully I can make some headway next weekend.

Wednesday, January 26, 2011

My Cookbook Fetish

I'm beginning to think I have a cookbook fetish! Okay, that might be a little dramatic, but I do love to buy new cookbooks. The other night, I picked up one of my favorites at Whole Foods (I was picking up Whole Foods' awesome Three-Cheese Focaccia bread ... I don't buy much at Whole Foods, but their bread is so good!).


It's really more of a magazine than a cookbook. If you haven't discovered "America's Test Kitchen," then you are missing out! I first learned of "America's Test Kitchen" when we moved to Texas last year. We have chosen to be a family without cable, which means there aren't a lot of shows worth watching on a Saturday morning. One Saturday, while on the search for our morning entertainment, we stumbled upon PBS and the "America's Test Kitchen" TV show. I fell in love immediately.

I come from a long line of amazing cooks. If you have ever been privileged enough to have a meal at my Mema's house, then you know what I mean. My mom is also a fabulous cook. I can definitely follow a recipe, but I don't have the knowledge and instinct that my mom and Mema have ... but I wish I did.

Well, that's why I love "America's Test Kitchen." It's a product of "Cook's Illustrated." Not only do the "America's Test Kitchen" books have amazing recipes, but with each one, they tell you the techniques used, why certain techniques and ingredients work better than others and step-by-step instructions. They identify what brands are best and why they stand up to others. The concept is that they have "tested" each recipe to perfection. 

I have made lots of their recipes, and I can tell you that I haven't found any yet that I don't like from mac and cheese, shrimp and grits, pan fried pork chops and Italian-style meatloaves. Some take a lot of time, so I reserve them for Saturdays. And, they also usually have some different type of ingredients that I don't typically keep at home, so you have to prepare, but the prep work is worth it.

I now have three different "America's Test Kitchen" books - 30-Minute Suppers (Summer 2010), Best of 2010 and now the Best of 2011. Here is a sampling of what's in the 2011 book, taken from the "America's Test Kitchen" website:

"The Best of America’s Test Kitchen 2011 features a wide range of recipes from starters to desserts, from meat and pasta to vegetarian dishes and desserts, including Hot Crab Dip (from our cookbook Best Potluck Recipes), Grilled Vegetable and Bread Salad ( from the Healthy Family Cookbook), Slow-Cooker Chicken Chili (from Cook’s Country magazine), Steak Tips with Mushroom Gravy (from Cook’s Illustrated magazine), Black Bean Burgers ( from our cookbook Light and Healthy 2010), and Individual Fallen Chocolate Cakes for Two (from our Cooking for Two cookbook)."

The Wall Street Journal reviewed it and said:

"While the skilled team at America's Test Kitchen doesn't shy away from the occasional elaborate recipe—their six-layer Strawberry Stack Cake requires 15 ingredients and a lot of patience—most of the 175 recipes in this compilation concentrate on mastering the basics and turning out delicious home cooking with a minimum of wasted time ... If, like frontiersman Kit Carson on his deathbed, you've ever wished that you had 'time for just one more bowl of chili,' this one is for you."

That's exactly how I feel with their recipes! I get excited every time I plan a dinner from one of these books, because I know it is going to be so good. Mmmm ....  I can't wait to try out some of these new recipes!

Do you have any cookbooks that you just love? If so, let me know!


Tuesday, January 25, 2011

The Big Reveal ... Dining Room

If you are looking for a workout, I highly recommend painting! My legs haven't been this sore in a long time (which may reveal how out of shape I am).

As I already mentioned, Landon and I painted the dining room this weekend and I couldn't be more thrilled with how it turned out. If you'll remember, we decided to go with a dark grey after testing out a few shades. It definitely darkened the room, but I think it gives it that "dark, dramatic" look I wanted.

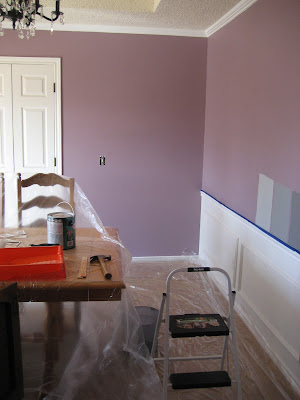
Here is the room all prepped and ready for painting:


We had read that if you'll put some holes in the rim of the paint can, it will help not leave a gooey mess of dried paint around the rim, so we thought we'd give it a try. 


It did work, but we probably should have put a few more holes in it. 

Landon and I have a good routine for painting, which is I handle the trim and he rolls. That worked great until I got a little slow on the job (I trim by hand with a paint brush), so Landon started trimming around the ceiling while I did around the baseboards. In the end, we got it done in a relatively quick time frame. Because the paint was so dark, we didn't need to prime and only had to put on one coat.

Once the paint dried, I was able to unpack our final boxes, at last, which was my china. (Notice the "original" boxes from when we got married nearly six years ago. Those have stayed with us through ALL our moves, which have been a lot!)


And, I was able to put my china in my china cabinet. This is a really special piece of furniture to me, because my dad made it for my mom when they got married. When he made her a newer one right before I got married, I laid claim to this one. I love it not only because it's beautiful but also because I think of my sweet dad every time I see it!


And, now, the dining room is one step closer to being done! Here it is with the new grey walls. I  already love it, especially with my black chandelier! I think it's going to look great when the dining room table gets done and we hang some things on the wall.  Oh, and I'm on the lookout for curtains, too. I have a few ideas but haven't exactly decided what I want yet. I'm open to any thoughts you have!


Sunday, January 23, 2011

Creating a Beach Oasis

Whew, yesterday was such a busy day! Landon and I finally accomplished the big task of painting the dining room. It looks great. I can't wait to show you the pics. We have to get everything back in place today, so pics will be coming soon!

Another room I've been thinking about lately is my sunroom. It's located right off of my living room and looks out onto the backyard. Currently, it's empty except for a bookshelf, but my goal is to make it a serene reading room. I'd love to give it a "beachy" feel, and matter of fact, I brought home some shells with me last time I went to visit Landon's parents in Miami.

Well, the other day, I was in one of my favorite stores - Kohl's - on my lunch break, browsing for various things. I stopped by the "home" section and a few things definitely caught my eye:


I'm thinking these would be perfect for my beach theme. I didn't get them but may have to watch for them to go on sale. Also, I saw this:


Who knew Kohl's had furniture? Just another reason to love that store!

Friday, January 21, 2011

My Creative Friend

My childhood best friend Ashley, whom I've known since kindergarten, definitely trumps me on creativity! Ashley just recently got engaged (yea!!!) and is busy planning her fabulous DIY wedding.


Well, last week, unexpectedly, I received something in the mail from Ashley (we live several states away). Just to get mail is always exciting, but imagine my surprise when I opened up the box and found this!

Seriously, how creative is that?!? 

We've made a lot of memories together over the years, and I'm so excited to be a part of her big day, which is on April 2! Congratulations, Ashley!!!!

Wednesday, January 19, 2011

Yellow Blossom Bottoms

Landon says that having a blog has made me much more productive, and he's right! So, if your looking for motivation to get things done, maybe you should start a blog!

This past weekend, Joann's was running a sale on upholstery fabric, so since I was in need of something to cover the bottoms of my Craig's list dining room chairs, I thought I should take a quick trip on Saturday.

As someone who doesn't sew, I feel pretty lost in the Joann's fabric section. This may sound ironic, since I spent many a times here as a child with my mother (who is a fabulous sewer), but I was usually looking at the pattern books and not paying too much attention to anything else. 

But, once arriving, I quickly made my way back to the upholstery section of Joann's and began looking around. 

If you'll remember, the colors of my dining room are greys and gold-ish yellows. At first glance at the Joann's selection, I was pretty disappointed. There were lots of gorgeous reds, blues and even greens, but when it came to yellow-patterned fabrics, the selection was really limited. 

The first possibility I saw was a more minimal fabric with cute birds. 


I'm not sure why I was drawn to this, because it had more green than I was looking for, but I thought with white chairs, it could really be unique. The only problem was it was a silky, hand-wash fabric. Given I can be a messy eater, I decided that would not be the best choice for the chairs.

So, I kept on looking and eventually stumbled upon the perfect fabric. It was a little more yellow than I had originally planned, but it also had grey in it. In addition, there is a hint of red, which is perfect because my everyday dishes are red.

I decided this was it and got ready to step up to the cutting counter get the appropriate amount when I realized I didn't know what that amount was. A minor detail, but I had neglected to measure the seat bottoms before leaving the house! Oops! Luckily, I called Landon and he graciously measured for me. It helped that when he took off the covering currently on the chair, their was another underneath. So he was able to measure the top cover and give me the dimensions over the phone. Then, because my mind doesn't work in yards, I carefully did my math to convert the sizes.

Because the fabric was only 45 inches wide, I calculated I needed 5.75 yards. (I asked the nice lady at Joann's to check my math, which she kindly did. She had also informed me the fabric was 45 inches wide ... that was not common knowledge to me.)  

All was well until she started rolling out the fabric, at which time we discovered the roll only had five yards. I thought all was for naught but then she asked if I wanted her to check another store. Yes!

Come to find out, another store about 20 minutes away had six yards! So, I hurried up to that store and bought all of it! Here it is up next to my paint sample. What do you think?


Now, the funny thing is that once I got home I asked Landon if he had a staple gun, to which he said, "No." So, guess what I'll be buying very soon! 

Tuesday, January 18, 2011

Craig's List Find

A few week's ago, I began watching Craig's list for a dining room table. I see lots of DIY bloggers who have found amazing things on Craig's list, so I thought surely I could find something, too. 

I didn't quite know what I wanted, but I did know I wanted something to which I could give a little TLC. Also, while it's only Landon and me right now, we wanted to have enough room for guests, so I really wanted a table that would hold eight. Oh, and I didn't want too pay much!

When I first started looking, I was afraid I wouldn't find anything to fit my "wish list." Many listed only held six or were a little more than I wanted to pay. But, after a few days, I found the perfect table!

It definitely needed some TLC but it had two leaves to extend it and eight chairs. Plus, the price was just right at $200. 

So, I went by to take a look and after offering $150 (because a few of the chairs were wobbly), we brought it home! The woman I bought it from had purchased it herself four years ago on Craig's list with the same intention of redoing. But, she never got around to it and with now having two kids, she decided it was time to pass it along. When I picked it up, she asked that I send her pics once I redid it. Here's what it looks like right now:


As far as I can tell, the table is made of pine. It has some scratches on the top, which we'll attempt to sand out.


And it has pedestal "legs."

This pic was taken when I bought it, hence the hardwoods. We have carpet in our dining room.

The chairs have some great carvings on the top.


Now, one of the chairs is missing the little wooden ball on top, so I'm on the hunt for something to replace it with. I've looked at Michael's and Joann's but haven't found anything identical yet. I'm planning to try Hobby Lobby, too, but if you have a suggestion, please let me know.

After giving it some thought, I think I am going to paint the chairs white and stain the table a little darker, but, I'm open to any suggestions / thoughts you have!

Sunday, January 16, 2011

Chic Chandelier

When we first bought our house, I saw the brass chandelier in the dining room as a piece with lots of potential.
Not the best pic, I know, but it's the only "before" pic of it hanging that I have!
I knew I wanted to give it a face lift with a fresh coat of black paint. So, last weekend, we decided to make this happen.
First things first, we had to take it down and remove all the crystals. I enlisted Landon's help for this task.

Having never painted a chandelier, I also thought it would be wise to peruse the World Wide Web for a few pointers. One great tip I found was from the Karla's Cottage blog, which said to screw in burnt-out light bulbs so that you don't have to tape up the sockets. I thought this sounded like a great idea, and it was, though you will see in a few minutes that I ran into one little problem. I didn't actually have any burnt-out light bulbs, but had some nightlight bulbs that I no longer needed.

I realize how dusty the chandelier was until I took this picture ... ewww. So, I also took the time to wipe it down. Much better!

Once I cleaned the entire chandelier off, I taped off the wires and moved it out to the garage for the first coat of primer.

I must tell you that I didn't realize there were so many types of spray paint primers at Home Depot. I wasn't quite sure which one to get but I decided on Rust-oleum's Clean Metal Primer. It worked really well, as far as I know! The only caution I would give is that it does leave a sticky finish. I had on an old pair of tennis shoes, which I'm sure will be forever sticky on the bottom!

Because of the many nooks and crannies on the chandelier, I had to turn it a few times and add several coats. For the second coat of primer, I thought I would try placing the chandelier in a box to spray it. I had seen this on one of the websites.

It did help with the containing the spray paint, but this is where the light bulb idea got me into trouble. See, I first placed the chandelier upside down in the box so I could get the bottom covered, and when I did, one of the bigger bulbs ended up breaking off. Hmm ... so I taped it up and kept on going, this time without the box. (Once it was all done, I was able to easily get the remainder of the bulb our with a pair of pliers, so it ended up being fine.)

I will say that one of the hardest parts of this job was waiting on the coats to dry :) Yes, I'm impatient! So, in between coats, I decided to clean off the crystals. Once again, I didn't realize how dirty they were until I started this process. I just put them in a bowl in the kitchen sink with a little dish detergent and hot water. It worked wonders!

That took just enough time that I was ready for my first coat of black spray paint. I chose to use Rust-oleum's Universal Hammered Spray Paint. It gave a great coverage. After two coats, here is my finished product.


You might notice the little "bubbles" on the chandelier. I'm not sure what the problem was, but I've deducted it was one of three things:

1) I did this last Saturday on a 60 degree day but the temperature was dropping throughout the day (you may remember it snowed the next day). By the time I put the black on, it was a little chilly. It could have been too cold for the spray paint.

2) Because of the cold, I may have rushed the last step, so it may not have had enough time to dry in between each coat.
3) I may have put the coats on too thick.


Well, it may not be perfect, but I've now learned. (Oh, I might not have mentioned, either, that this was my first spray paint project, ever ... as in, in my entire life. So, I figured for the first time, it didn't turn out too bad. Plus, once it was hung, with all the crystals added, you cannot see those bubbles!) What do you think?

I think it's going to look amazing with our dark grey walls! I also have a smaller chandelier very similar to this one in the foyer. I'll be painting it, too, once it warms up, so I'll have another opportunity to give it a go without the end "bubbles."

Saturday, January 15, 2011

Shades of Grey

So even though I've posted our whole house color palette, I've known I wanted to paint the dining room grey since we moved. The only question to be answered was, "What shade of grey?" So, on one of my many trips to home depot a few weeks ago, I picked up a few grey paint swatches and threw them up on the wall.

After a few elimination rounds, with the help of Landon, we decided to try out the dark gray on the left, which is Glidden Seal Grey. So, I took yet another trip to Home Depot to pick up a sample. (Oh, one nice thing about living in a big city is that there is one of everything on every corner. I'm blessed to have a Home Depot just a few blocks from my house and another just a few blocks from my office, so a trip to the store is no problem.)

One of the great things about Glidden paint, and partly why I chose it, is they have little paint samples that include a brush. Think "rubber cement."

I thought this would make things very easy, as I didn't have to pull out all my paint supplies. Well, it did except for the fact that the brush is really tiny and the paint gets on the brush handle and tends to drip, considering you are holding it horizontal in order to paint. Luckily, I was smart enough to put a trash bag down, because I knew I would be messy.
After a few minutes, I had a nice little sample on the wall.

Now, one thing you'll notice about the above pic is my textured walls. All I can figure is that this is a trend in Texas. Every house - new or old - has them. I'm used to nice, smooth walls and actually think I prefer them, especially since one of the latest trend is painting stripes, but this is what I have, so I guess I'll get used to it. I will say one thing ... it makes painting a little harder, or at least it did with this sample.

Well, I looked at this shade of grey for a week before deciding that maybe I needed to throw a few other shades up to make certain this is what I wanted. So, back to Home Depot I went and picked up two more paint samples, each a little lighter than the other.
Glidden's Pebble Grey, Granite Grey and Seal Grey

I put these two colors on the wall as well and then stood back to examine.

I easily decided the Pebble Grey, on the left, was a "no." Landon and I both gave some consideration to the other two, but in the end, we decided that we'd go with the Granite Grey and use the darker Seal Grey for an accent color.

Well, today, right before heading back to Home Depot to pick up a gallon of paint, we re-examined the wall again and changed our minds! Ha! We decided we really did want a darker, dramatic dining room, so we officially bought a gallon of Seal Grey! (This decision could have also been partly influenced by a friend who came over last night and pointed out how much he liked the dark grey.)

I had plans to paint today, too, but some additional errands took longer than expected. So, we'll either try and paint it tomorrow between church or next weekend. Either way, the paint has been bought so we are one step closer!