Tuesday, April 26, 2011

Filling up the Backyard

Over the weekend, Landon and I finally filled in the remaining of the backyard landscape with some plants. We had taken several trips to Home Depot before finally deciding what we needed. Gardening isn't really our forte, so hopefully these were the right choices.

We decided to plant two Azaleas, some Marigolds and a Miss Ruby Butterfly Bush. I'm really excited to see if the Butterfly Bush really does attract butterflies.


Monday, April 25, 2011

Birthday Cakes & Prize-Winning Pies

Today is a great day because it's my mom's birthday!


If you don't know my mom, I'm basically a spitting image of her ... which is a good thing! I love her to death. Happy birthday, mom!

In honor of my mom's birthday, I thought I'd share a recipe with you. On Saturday, our church had an Easter celebration complete with an Easter egg hunt, carnival games and a pie contest. When I asked Landon which pie I should make, he immediately said Kentucky Derby Pie, which is a recipe my mom had given me. Now, normally, I would not be so brave as to enter this into a contest. First off, pies are not really my specialty in the baking division. I much more prefer cakes. Also, almost every time I've made this particular pie, the end result has been a little runny. But, this is the one Landon asked me to make, so I thought, "Why not?"

You could say making this is "as easy as pie." Here's what you need:


1/2 cup of butter
1 cup sugar
1/2 cup flour
2 eggs (though I might try three next time ... see below)
1 teaspoon vanilla
3/4 cup pecans
3/4 cup chocolate chips
Pie shell

I've never been one to make my own pie shells, so I suggest either buying the frozen kind or going with the Pillsbury roll out crusts that can be found in the refrigerated section of the grocery store.


All you need to do to make Kentucky Derby Pie is mix all the ingredients together, fill your pie shell and bake at 350 degrees for 30 to 45 minutes.


It looked great, but as is typical, when they started cutting into it at the church, it proved to be runny once again. But apparently, those at church didn't mind, because it went pretty fast and still tasted delicious.


The judges must have thought so, too, because they awarded me the Best Overall Pie in the contest! 

Now, I still want to figure out this "runny" pie issue, so a friend of mine suggested adding three eggs instead of two. I think I'm going to try this the next time a make it, but even runny, it's good to know that it is officially a "prize-winning pie!"


Friday, April 22, 2011

Things I'm Liking

I thought I'd try something new this week. I have a long list of pretty cool bloggers that I follow who are posting some amazing projects and inspiration, so I thought it might be fun for me to spend Friday's by telling you about things I'm liking. What do you think?

Here are a few things I'm liking this week. Click on the photo caption to go to the blogger's full post for more info:

Thrifty and Chic's Desk Made from an Old Dresser

Young House Love's Tips for How to Easily Hang a Gallery of Frames
The DIY Industrial Pipe Table from Apartment Therapy
Pretty Handy Girl's DIY Towel Hook
Nothing a Little Paint Can't Fix's DIY Home Address Sign

I hope you are as inspired as I am!

Thursday, April 21, 2011

My Faith on the Wall

For those of you who are Christians (like me), you know what an exciting week this is as we get ready to celebrate Christ's resurrection on Sunday. 

Since our minds are already on the Cross, I thought I'd share some inspiration for my dining room wall. I decided a while back that I wanted to start a wall of crosses. I love the decorative crosses that many stores carry now, and I love that I can express my faith on my wall.

Last fall, I went to the sale of Rebecca Ellis, a local Dallas artist who just happens to be my boss' sister-in-law. Rebecca is beyond talented and every year right before Christmas, she hosts a sale with all of her product being sold at wholesale. Knowing I wanted to begin a cross collection, I picked this one up at the sale:

Rebecca was inspired by knitting when making this, because when I bought it she asked if I knit. I don't. I just thought it was interesting!

Then, for Christmas, my staff gave me this one, which was also bought from Rebecca:


This one is hand-embroidered leather. The detail is amazing. I love it!

I've been waiting to hang these on my dining room wall and  had looked at a few others here and there but decided I wouldn't buy anymore for a while. But, at church on Sunday, one of the Sunday School classes was selling baked goods and crafts. Landon pointed out a beautiful, blue beaded cross, but ironically, I only had one check left with me (because I never have cash), and knowing I was headed to the Estate Sale on the way home, so I told Landon we'd have to pass.

Well, imagine my surprise when Landon called me on Monday and said that one of the ladies at church had noticed us admiring it and decided to purchase it as a gift for us! I was shocked, and felt very blessed.


So now I have three crosses -- each unique in its own way and each handmade. I can't wait to get them hung in the dining room. 

Wednesday, April 20, 2011

Estate Sale Goodies

I was so excited last week when I received an email telling me there would be an Estate Sale near my house over the weekend (you may remember I put myself on the mailing list at the last Estate Sale). Knowing that last time I went on Friday when there were still plenty of good items, I knew getting to this one early was key. 

So during my lunch break last Friday, two of my co-workers joined me for the Estate Sale. There were still lots of things being offered. A few items caught my eye including an antique looking mirror and an antique tea cart. Unfortunately, both were priced a little more than I wanted to spend. Plus, after speaking with those hosting the sale, I found out that everything would be 25 percent off on Saturday. So, I thought I'd take my chances and see if they were still there when I came back. I went with the, "If it's meant to be" mentality. But, I did go ahead and purchase this:


It's only about 15 inches long and five inches wide, but I was drawn to the uniqueness of it. I thought it was $8, but when I got ready to pay, the woman informed me that what I thought was a dollar sign was really a one! So, it was $18, but apparently, I looked pitiful when they told me this news because they were generous and gave it to me for $8.

When I went to see if the tea cart and antique mirror were still there, I was not really surprised to find that they were not. Oh, well. I guess it was not meant to be. But, I went back again on Sunday and everything was 50 percent off! Sure, there wasn't much left, but I managed to score some great finds for just a little over $11.


I know they don't look like much now, but my plan is to spray paint everything bought at the Estate Sale and use it on a wall in my bedroom. I'm hoping the end product looks a little something like this:

My Uncommon Slice of Suburbia
Danielle Oakey Interiors
Dwellings By DeVore

I was proud of myself for seeing the potential in these items. A few months ago, I probably would have passed them by as junk. I probably shouldn't count my chickens before they hatch considering my plan could fail, but I have my spray paint and am hoping to get to work on this, this weekend.

Tuesday, April 19, 2011

Pillows Made with Love

Oh, man. I spent all day Saturday and much of Sunday working on a big project and yet I STILL didn't get done! I can't wait to finish and post it for you, but you'll probably have to wait one more week.

In the meantime, I wanted to show you something that I recently added to my guest bedroom .... pillows!


These aren't just any pillows; these are pillows made by my wonderful and very talented mother! She surprised me with them when we went to Nashville a few weeks ago. She is one of the biggest fan of my blog and my coach who helps me get through all these various projects (I call her anytime I have a question or frustration). Since she knew I had blogged about my fascination with pillows, she made me two new ones, complete with ruffles (which is what I love)!!


I love them both but the white one is the most special, because it is made out of the same fabric she made my ring bearer's pillow out of more than six years ago.

I already placed them on my guest bed. I think they look great and pull in all the various colors of my quilt, which was made by my wonderful and talented mother-in-law (yes, be jealous. I have two great moms).


I've added a few items to give this room a "Nashville" flair, and now that I have two DIY items from my mom (who lives in Nashville) and my mother-in-law (who formerly lived in Nashville), I think it's even better!

Wednesday, April 13, 2011

Bathroom Chandeliers

As silly as it may seem, I've become a huge fan of chandeliers in the bathroom. We've said before that we want to change out the light in our master bathroom where the tub, shower and toilet sit, since it's just a globe light. And after talking it over, I think it's a "go" for the future!

I think there is something chic and classy about adding a chandelier to the bathroom, and I think it would make me feel like being in the bathroom was a bit more fun. So I say, "Why not?"

Here are a few pics of bathrooms with chandeliers ...

Country Living
The Lettered Cottage
Sweet Chaos
My bathroom isn't as "open and airy" as these, but I still think it deserves a chandelier!

Tuesday, April 12, 2011

Kitchen Changes

Okay, so the title of this blog post could be deceiving. No, I didn't get around to doing any re-dos in my kitchen this weekend, but I did change my mind about what I wanted to do with it. Well, really, I just changed my mind back to what I originally thought I wanted to do.

You might remember that I posted a while back about my dream to paint my kitchen, which included white cabinets and black counter tops. But before I settled on that decision, I had originally thought I wanted sage green cabinets. This was partly  because I thought it would be best - for financial reasons - to take baby steps in the kitchen, and since I already have a beige counter top, I thought I could paint the cabinets and get away with it for a while until I could afford some pretty new counters. Plus, I thought the green would nicely complement my red and black decor, but not in a Christmasy way!

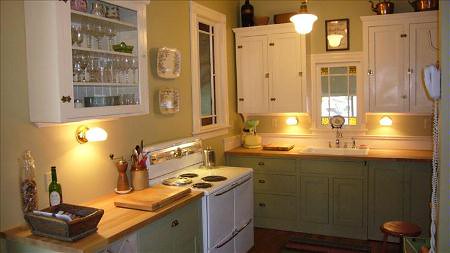
This is not a good pic (look at all the junk on the counters!) but it gives you an idea of what I have to work with ...
When I was putting together my whole house plan, I kept being drawn to white cabinets with black counters. I knew this might be a problem, because as you can see in the above, I have both white appliances and a white tile floor, both of which are in good shape and don't really need replacing. Plus, I have other things I'd rather spend my home budget on, so I thought I'd make it work somehow.

All that said, I saw a kitchen, in person, which had sage cabinets, white counter tops and black and red accents, and I fell in love.

Let me try and paint you a picture. Over by the sink and stove, the owner had actually painted the bottom cabinets green and removed the top cabinets and simply put up open white shelving. I know this is a trend, but I don't think I could ever do this because it would require me to a) only display my nice dishes and b) keep everything clean. Sounds like a lot of work! But, on the other side of the kitchen, she had kept all the cabinets - on the top and bottom - and painted them white. In addition, where the kitchen table was, there was a red sparkly bench against the wall (with underneath storage) and chairs on the other side of the table. I've always loved the bench look in the kitchen, but I'm not sure my kitchen is designed for this. This owner also had an island in the middle, painted red with a wooden counter. My kitchen doesn't allow for an island, but it looked great in hers. Also, there was a clean white subway tile as the back splash, which I've been a fan of for a while.

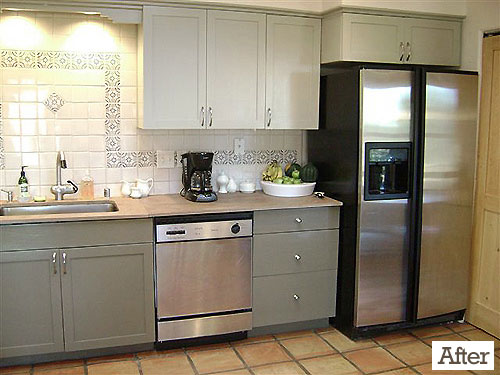
I know my description doesn't do it justice. I was going to post pics for you to see yourself, but since I didn't ask permission of this person to post it on my blog (I know, not very smart), I will just leave you with some similar pics.

http://kitchenbacksplashes.blogspot.com/2010/07/pictures-of-painted-kitchen-cabinets.html
http://www.flickr.com/photos/8230585@N06/3452309732/
http://www.decorpad.com/photo.htm?photoId=63824
http://www.younghouselove.com/other-redos/

So, here is what I am thinking (and please excuse the second messy pics, which were taken when we first moved in and are all I have at the moment. Yes - confession - I was going to take new pics as I was typing this, but realized the kitchen was still a little dirty and didn't feel like cleaning it!) ....


We'll paint the wall a very light greenish, gray. It will be a very subtle color, almost appearing white. Then, We'll paint the wainscot on the bottom white. The cabinets on the bottom will be sage green and the cabinets on top will be white. Because these upper white cabinets will be far enough away from the wainscot and white tile floor, I think it will work. We'll put in a nice, clean white counter top and a white subway tile back splash. Also, the little built-in, in the eating area will be white. Oh, and the ceiling fan above the kitchen table will be replaced with a beautiful fixture of some sort (TBD). I haven't been a fan of the fan since we bought the house, but I knew it would one day be gone, so it was not a deterrent! The curtains have also already come down.


I love dreaming. Now, the question is when can I actually do this! Well, one room at a time and if I don't finish this dining room soon, I'll never get to move on! Plus, because this room will not only take more work but also more money, I think it may come later down the road. We'll see!